📦 Installation
VNCme is a standalone application - no installation or dependencies required!
1. Extract the Package
After downloading, extract the ZIP file to your desired location.
2. That's It!
VNCme is ready to run. No Node.js, no npm, no compilation needed.
✅ Everything is included! The VNCme executable contains everything you need to start sharing your screen immediately.
Platform-specific Notes:
Windows: Just double-click vncme.exe
macOS: May need to allow app in Security & Privacy settings. Requires Accessibility permissions for remote control.
Linux: Run with ./vncme. May need to chmod +x first.
🚀 Quick Start
First Time: Activate Your License
Run VNCme for the first time:
Windows:
vncme.exe
macOS / Linux:
./vncme
You'll see the activation prompt:
╔════════════════════════════════════════════════════════════╗
║              VNCme - LICENSE ACTIVATION                    ║
╚════════════════════════════════════════════════════════════╝
Your Machine ID: abc123def456789ghijkl012345mnop
Enter your license key: VNCME-XXXXX-XXXXX-XXXXX-XXXXX
Activation Steps:
- Copy your Machine ID (shown above)
- Enter your license key (from purchase email)
- Visit vncme.co.uk/activate
- Enter your license key + Machine ID
- Copy the activation code you receive
- Paste it back into the VNCme prompt
- Press Enter - You're activated!
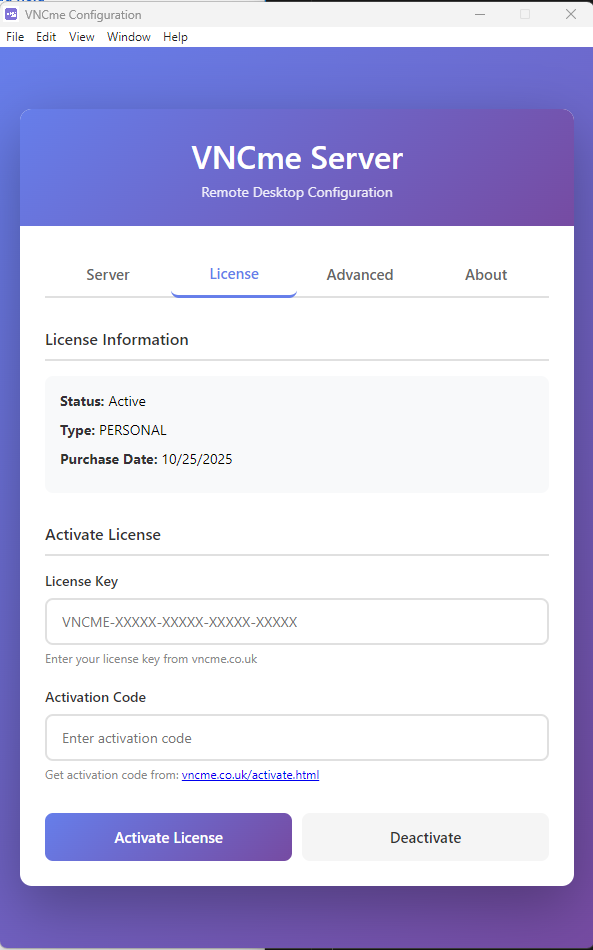
License activation screen with machine ID and activation code entry
✅ License Activated! VNCme is now ready to use on this computer.
Running VNCme
After activation, simply run VNCme again:
# Windows
vncme.exe
# macOS / Linux
./vncme
The server will start automatically and display:
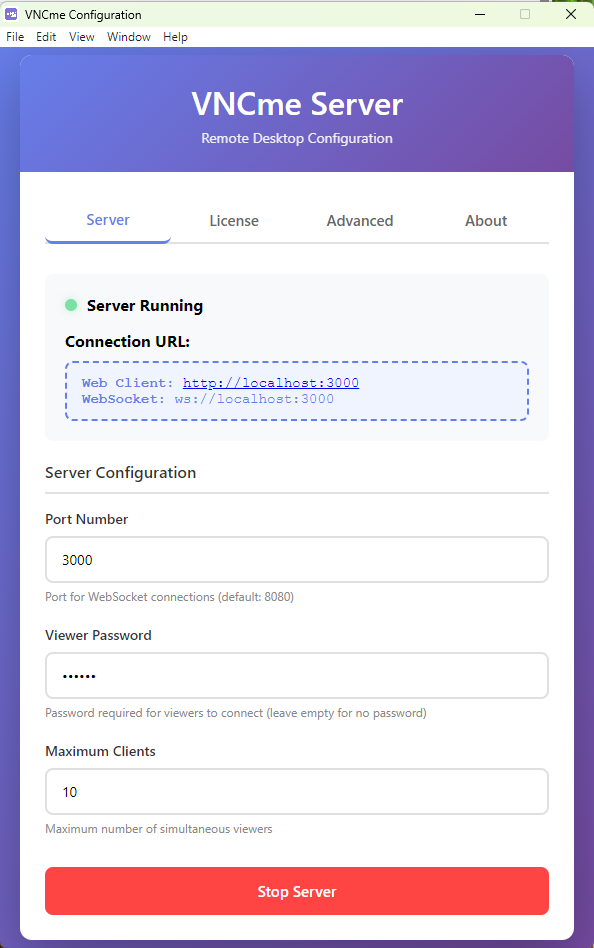
VNCme GUI showing server running with active license
Accessing the Web Client
Open your web browser to:
http://localhost:3000
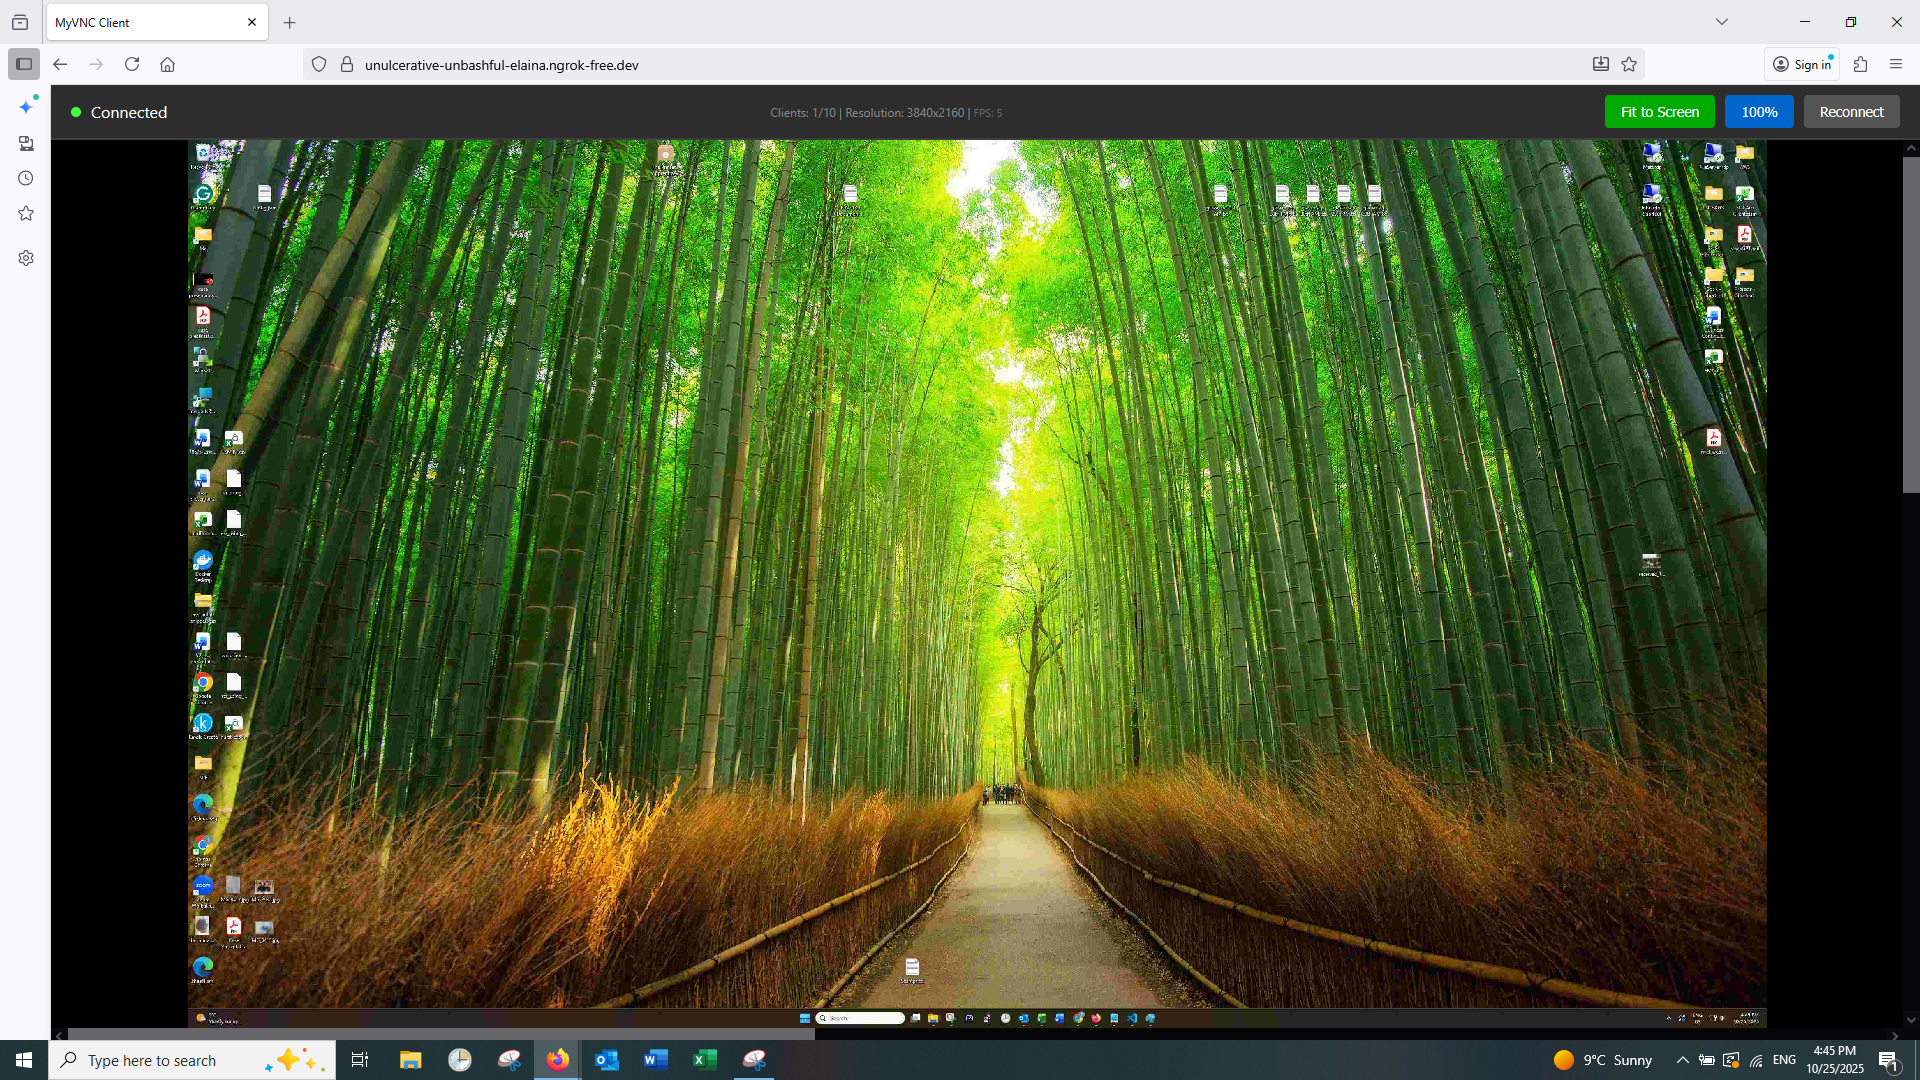
VNCme web client showing remote desktop stream with zoom controls and disconnect button
Success! You should now see your screen being broadcast! Share the URL with up to 10 viewers.
Internet Access (Optional) - 100% FREE!
VNCme now includes FREE unlimited bandwidth internet access!
- In the VNCme GUI, go to the "Advanced" tab
- Check "Enable Internet Access"
- Start the server - you'll get a free public URL instantly
- Copy the URL and password from the yellow info box
- Share BOTH with remote viewers (they'll need the password to access the tunnel)
💚 No signup, no bandwidth limits, no subscriptions! VNCme uses LocalTunnel to provide free unlimited internet access. Save £120+ per year compared to ngrok Pro or TeamViewer!
🔑 Note: LocalTunnel requires viewers to enter your public IP address as a password on first visit - this is automatically displayed in the VNCme GUI.
⚙️ Configuration
Server Settings
Edit src/server.ts to customize server behavior:
const PORT = 8080;           // WebSocket server port
const MAX_CLIENTS = 10;      // Maximum concurrent clients
const FRAME_RATE = 30;       // Frames per second (1-60)
const JPEG_QUALITY = 70;     // Image quality 0-100
Client Settings
Edit src/client.ts to change client server settings:
const WS_PORT = 8080;        // VNC server port
const HTTP_PORT = 3000;      // Web server port
Connecting Clients
Edit public/client.js to change the WebSocket URL:
// For local network
const WS_URL = 'ws://192.168.1.100:8080';
// For internet (ngrok)
const WS_URL = 'wss://abc123.ngrok.io';
Performance Tip: If you experience lag with multiple clients, try reducing FRAME_RATE to 15 and JPEG_QUALITY to 50. This will reduce bandwidth usage significantly.
🌐 Internet Access Setup - FREE & Unlimited!
💚 NEW: 100% FREE Internet Access with Unlimited Bandwidth!
VNCme now uses LocalTunnel for free, unlimited internet access. No signup, no bandwidth limits, no subscriptions!
Using LocalTunnel (Default - FREE)
LocalTunnel is now the default and recommended option!
- Open VNCme GUI
- Go to "Advanced" tab
- Check "Enable Internet Access"
- Click "Start Server"
- Copy the tunnel URL and password from the yellow info box
- Share BOTH the URL and password with your viewers
🔑 Important: LocalTunnel Password
When viewers first visit your tunnel URL, they'll be prompted to enter a password. This password is your server's public IP address, which VNCme automatically detects and displays in the GUI. Simply copy both the URL and password using the "Copy" button and share them with your viewers.
✅ That's it! No signup, no auth tokens, no configuration. Just check a box and go!
Benefits of LocalTunnel:
- ✓ 100% FREE forever
- ✓ Unlimited bandwidth (no 1GB limits like ngrok free)
- ✓ No time restrictions
- ✓ No signup or account required
- ✓ HTTPS enabled automatically
- ✓ Works instantly
Using Port Forwarding
For more control, configure your router to forward port 8080:
- Access your router admin panel
- Create a port forwarding rule: External 8080 → Internal 8080
- Find your public IP at whatismyipaddress.com
- Share:
ws://YOUR_PUBLIC_IP:8080
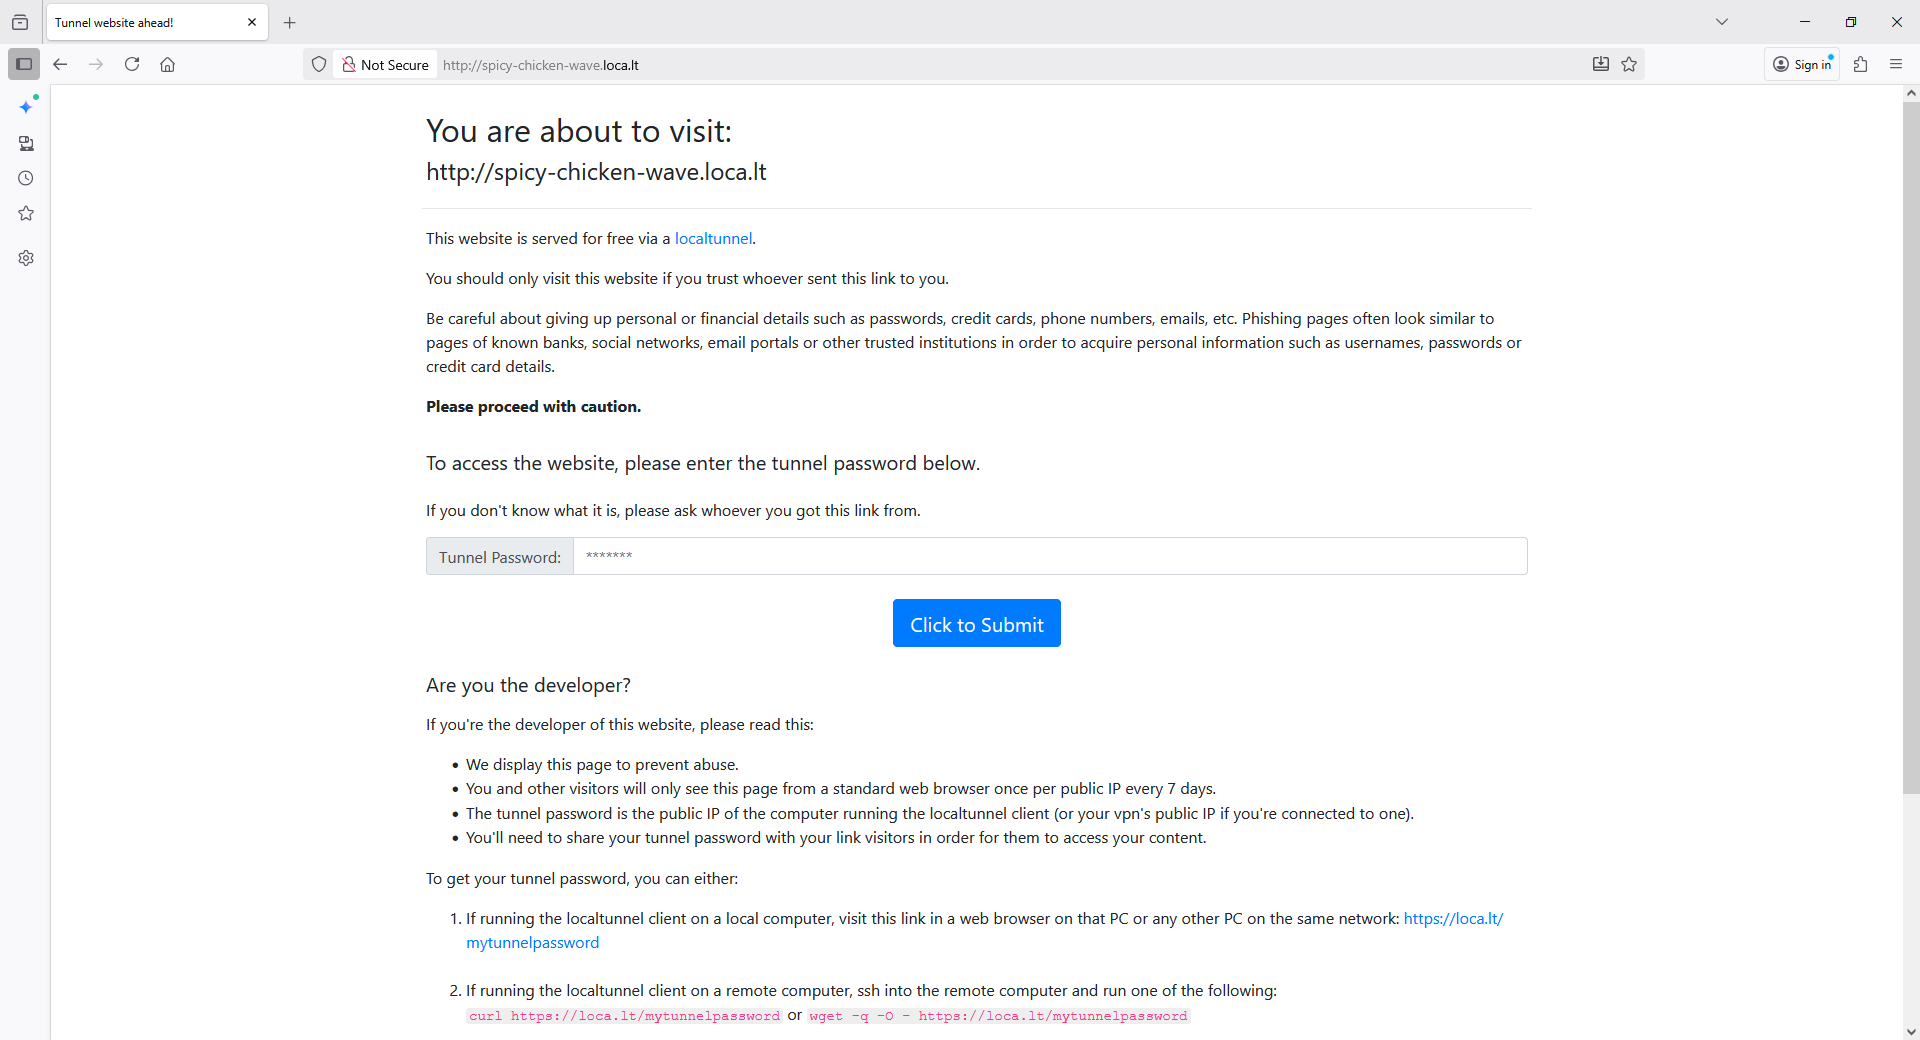
FREE tunnel setup with LocalTunnel - showing URL and password
Security Warning: When exposing your server to the internet, anyone with the URL can view and control your screen. Only share the URL with trusted people and stop the server when done.
💡 Common Use Cases
Remote Presentations
Share slides or live demos with multiple viewers without Zoom or similar services:
- Start server with tunnel:
npm run server:tunnel
- Share the public URL with attendees
- Present your screen while viewers watch in their browsers
Team Collaboration
Quick code reviews or debugging sessions with teammates:
- Start server on local network
- Share local IP URL with team members
- Let them watch your screen or grant control for pair programming
Customer Support
View customer screens or demonstrate solutions:
- Customer starts server with tunnel
- Support team connects via shared URL
- Support can see the issue and optionally control the customer's screen
🔧 Troubleshooting
Server won't start
- Port already in use: Change PORT in server.ts or stop other apps using port 8080
- robotjs installation fails: Install platform-specific build tools (see Installation section)
- Permission denied: On macOS, grant Accessibility permissions in System Preferences
Clients can't connect
- Wrong URL: Verify the WebSocket URL in client.js matches your server
- Firewall blocking: Allow port 8080 through your firewall
- Network issues: Ensure server and client are on the same network (for local) or use tunnel mode
Poor Performance / Lag
- Too many clients: Reduce MAX_CLIENTS if your upload speed is limited
- Low bandwidth: Reduce FRAME_RATE to 15 and JPEG_QUALITY to 50
- CPU usage: Lower screen resolution on the host computer
- Network congestion: Use wired ethernet instead of WiFi
Keyboard/Mouse not working
- macOS: Grant Accessibility permissions to Terminal/Node
- Windows: Try running as Administrator
- Linux: Check X11 permissions for input simulation
Tunnel Mode / Internet Access Issues
- Port 3000 already in use: Close any existing VNCme instances or other apps using port 3000. The GUI automatically attempts to kill existing processes on restart.
- ngrok authentication failed: Your ngrok authtoken may be invalid or expired. Get a new token from ngrok dashboard and run:
ngrok config add-authtoken YOUR_TOKEN
- ngrok not found: Install ngrok from the ngrok website or Microsoft Store (Windows)
- Tunnel won't establish: Check that ngrok is properly installed and your authtoken is configured. Restart the VNCme GUI after configuring ngrok.
- Connection drops: Free ngrok accounts have session time limits. Upgrade to a paid plan for unlimited sessions.
🔬 Advanced Topics

Advanced server configuration options including password protection, port settings, and quality controls
Adding Authentication
To protect your server with a password, modify the server to check for a token:
// In src/server.ts
const AUTH_TOKEN = 'your-secret-password-123';
// Check on client connection
if (message.type === 'client_hello' && message.token !== AUTH_TOKEN) {
    ws.close();
    return;
}
Custom Branding
Customize the client interface by editing public/client.html and public/client.js. Change colors, logos, and text to match your brand.
Recording Sessions
To record VNC sessions, modify the server to save frames to disk or use a screen recording tool on the host computer.
Bandwidth Optimization
For optimal performance over slow connections:
- Use JPEG_QUALITY: 40-50 for acceptable quality at lower bandwidth
- Set FRAME_RATE to 10-15 for smooth but efficient streaming
- Consider implementing frame skipping for very slow connections
📁 Project Structure
VNCme/
├── src/
│   ├── server.ts              # Main VNC server
│   ├── server-tunnel.ts       # Server with ngrok tunnel
│   ├── client.ts              # HTTP server for web client
│   └── protocol.ts            # Protocol message definitions
├── public/
│   ├── client.html            # Web client interface
│   └── client.js              # Client-side JavaScript
├── dist/                      # Compiled JavaScript (after build)
├── package.json               # Dependencies and scripts
├── tsconfig.json              # TypeScript configuration
├── README.md                  # Project overview
└── INTERNET_ACCESS.md         # Internet access guide
📞 Need More Help?
If you're still having issues:
- Check the
README.md and INTERNET_ACCESS.md files in your download
- Review the error messages in the server console
- Check browser console (F12) for client-side errors
- Verify all prerequisites are installed correctly